Spinning With Silk
Tabi Ferguson, Waterloo, Ontario
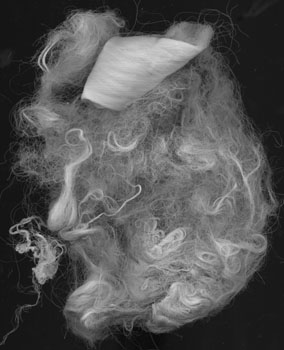
"I hand blend luscious fibers together in my spinning."
"Silk is my favourite fiber to work with and the Salt Spring Island colorways in particular shine through each blend and change with the light giving the handspun yarn life."
The red is merino, alpaca and silk (Sunset Swing colorway from the Salt Spring Island Series).
The blue is merino, mohair, angora and silk (Trincomali Two Step colorway - no longer available).
The green is merino and silk (Macchu Picchu colorway - no longer available).
Tabi Ferguson also knits fabulous silk scarves which Treenway Silks has featured in past newsletters.
The Inside Out of Spinning Silk
Written by Celia Quinn
Celia Quinn has been our fibre consultant for many years. She has made numerous suggestions for additions to our line of silk fibres and silk/blend fibres. Our Chinese suppliers have been eager to help fulfil these requests. We are grateful to have such an excellent spinner as part of our team. Celia has taken the time to pass along helpful information about using all of our fibres. She can be reached at quinnspins@yahoo.com
Preparing your hands for spinning
It is a good idea to smooth the rough spots on your hands by using lemon juice, sesame milk or a good hand lotion, otherwise the fine cobwebs of silk will catch in every crack! Any good hand lotion helps if used frequently. Fresh squeezed lemon juice applied to the hands when the silk starts to snag again has worked in my classes.
In Japan, they make sesame milk to ease the catchiness of silk hankies and caps. They immerse the silk in the solution and dry the silk before spinning. I have used sesame milk as a hand lotion and find it quite soothing. To prepare: grind 1-2Tbsp. of sesame seeds in a mortar and pestle (or blender). Tie the ground seeds in several layers of cheesecloth and immerse in a cup or two of hot water. After it has soaked for a minute, squeeze the cheesecloth to release a milky substance. Dip and squeeze several times and then let the sesame seeds stay in the jar. Use this liquid on your hands. Be sure to refrigerate, or it will go rancid eventually.
During especially intensive period of spinning silk caps for a blouse (see Spin-Off, Summer '94), I found it very interesting that on some days I had to apply hand lotion every ten minutes, while other times I would go for days with no need of lotion. I am guessing the humidity levels varied.
Surgical gloves work well for pulling apart caps and hankies which avoids dealing with snags and rough, dry hands.
Treenway carries Silk Spinner Hand Scrub which is extra emollient with cocoa butter and carrot tissue oil. It works wonders for smoothing your hands for working with silk. Silk Spinner contains only natural ingredients: sugar, pure olive oil, cocoa butter, meadowfoam oil, carrot tissue oil, hand made silk soap and fragrance. Shop Hand Care
Try your hand at Silk Caps and Hankies
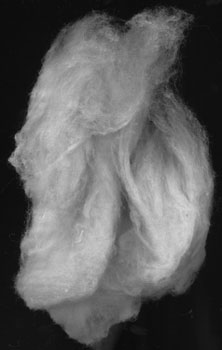
One of the most unusual fibre forms available to handspinners today is a glistening web of silk filaments that has been stretched into either a mawata square (hankie) or a cap shape. Mawata is a Japanese word that loosely translated means expanded cocoon. Hankies and caps are made most commonly from Bombyx silk cocoons that are not suitable for the reeling process. The cocoons used to make caps and hankies may have been misshapen, discolored or have a hole pierced in them.
Hankies
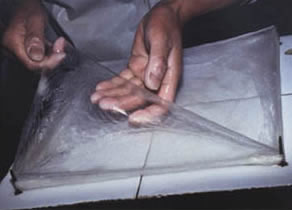
I first encountered these long fibres when I purchased Bombyx silk squares from Japan, known interchangeably as mawata or hankies. The cocoons are softened in warm, soapy water, the pupa removed and the cocoons gently stretched as evenly as possible into a gossamer film onto a square frame. Hankies come in a bundle (approx. 500gm-1lb) of thin sheets, 4.5-6.5 gm/sheet.
Caps
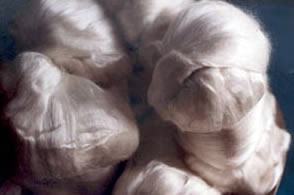
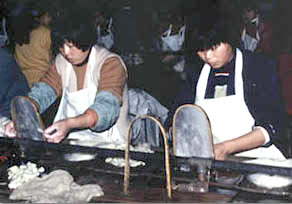 Much later I discovered silk caps from China, which are also made from degummed cocoons that have been stretched into a cap shape over an arched bamboo slat. Ten cocoons are pulled over the frame to make one cap. Caps generally weigh 14-20 grams. Enough caps are stacked on top of each other until the pile weighs about 500 gm (1lb). One more cap is opened and slipped over the stack, like a hat and tied at the bottom to make a neat, compact package called a bell.
Tussah (silk from a wild caterpillar) caps have appeared and disappeared on the market. The tussah caps I've seen have been fairly dark in colour and varied from tiny caps to enormous bag shapes.
Preparation of hankies and caps
The spinning method is basically the same for caps and hankies. You need to work with a very thin layer of these long, strong silk fibres, otherwise they will be impossible to draft. Even with a thin layer, the edges of the cap or hankie are strong and dense, and must be snapped apart to facilitate drafting.
Hankies
It is easy to separate a thin layer of mawata squares (hankies). Simply grasp a corner and peel a layer off. If it is not a transparent layer, peel again. Sometimes it won't work well from the corner. If this is the case, grasp the centre of the square (on either side of the layer) and pull apart to get an extremely thin piece. The thinner the layer, the less stress to your hands and wrists while stretching and drafting the fibres.
Elongate the thin square into a rectangle (not narrower than 2"), by snapping the square between your two hands. This is all I do to prepare a hankie for spinning.
Caps
Peeling a layer of cap is essentially the same. I start at the open end of the cap, and peel a layer up and over the top of the cap. You can also slip the cap over a chair back to hold it as you peel off layers. After you peel a thin layer, divide it further by pulling from the inside and outside on top of the cap. Slip one hand inside the cap, right up to the top, where you will pinch half the thickness in your fingers. Pinch the other half of the layer with the other hand, which is also on top of the cap, but on the outside - so your fingers are touching. Slowly peel the layer of cap in half. Holding on opposite ends of the open edge of the cap, snap outwards to form a rectangle. Snap the silk until you can feel that strong edge give a little, but try to keep the rectangle at least 2-3" wide.
Another method is to snap the cap or hankie once or twice to make a wide rectangle, then poke your fingers in the centre to make a hole. With your hands inside the hole, snap outwards to make a loop, which will form a roving when broken. Take care not to thin the loop too much (aim for 2" wide). If the roving is too thin, the twist can advance into the roving too far, making drafting impossible. The twist cannot physically compress a wider roving easily, and you have more time to draft your fibres without incident.
The fibre market is ever changing. In my first several years of spinning, only Japanese Bombyx mawata (hankies) were available. Then Chinese Bombyx caps appeared, while hankies disappeared off the market. Now Chinese caps and hankies are both available.
Videos of Spinning Silk Hankies
Spinning Dyed Silk Hankies: Watch Video
How to Draft Silk Hankies (Mawata) for Knitting or Spinning: Watch Video
How to: Spinning Silk Hankies: Watch Video
How To Spin Silk Hankies on a Spinning Wheel: Watch Video
Silk Hankies by the Corner: Watch Video
Spinning Caps and Hankies
With the thin, stretched layer of silk in hand, spinning can begin. Caps and hankies tend to spin into fine yarns, so adjust your wheel with a light takeup. Pull out a few fibres and tie them onto your leader (they tend to slip off otherwise). There are two important points to keep in mind:
- keep the drafting triangle wide
- keep your hands far apart (12 inches is a good average distance).
The spinning method is worsted. Pinch the yarn right where it joins the fibres. With your other hand, draw the fibres out away from the orifice, and then slide over the drafted fibres with the pinching hand. Pinch, draw, slide is the chant. The pinch gives you something to draft against. You will feel some resistance as you draft, but it should not be a struggle. That would aggravate wrists, fingers and your spirit! Keep the fibres open and your hands far apart, The fibres are long and if your hands are too close together, you are pulling on two ends of the same fibre! The idea in drafting is to slip the fibres past each other: slip, don't rip!! Since there are also very short fibres present in both caps and hankies, occasionally your drafting hand will have to jump forward to stretch out fibres that are shorter than the distance between your hands, or the short fibres will make slubs in the yarn. If you run into a clump of short fibres, it's best to remove them. One other cause of slubs is a result of letting the twist enter too many fibres before they are drafted.
Spinning Caps "Distaff Sytle"
An umbrella swift can be used like a distaff to spin caps only (not hankies). Drape a piece of muslin or other smooth fabric over the swift. Peel the cap so you are working with 1/3 or 1/2 of the amount. Put your hands inside the edges of the partial cap and snap a few times, just enough to ease that strong edge apart a bit. Slip this onto the covered swift, expanding the swift to support the cap as much as possible. It should hang down over the swift about 8 inches. Simply pull fibre down from the bottom edge, twist and then slide up to pull down the next length. If too many fibres come down at once, hold the fibres back with one hand at the bottom edge of the cap, and pull against that hand with the other one while drafting. Adjust the swift to fit the cap as it gets smaller. You may have to spin the last bit just in your hands - with the silk off the swift.
Joins
If the yarn snaps at a thin spot, go back to a slight thickening in the yarn, and break it there (by untwisting). Fan it out, overlap it with your fibres, moisten lightly and twist until the fibres are joined again. Very thin sections are difficult to join, so go back and join it where it's thicker.
Twist
The amount of twist added to your yarn is somewhat subjective. Since the fibres are so long, it takes very little manipulation to reach minimum twist (no slippage when a length of yarn is steadily pulled on). For use as a warp, the yarn should have a firm twist. For other uses, I usually give fine silk yarns a moderate twist. More importantly, I spin them as consistently as possible. Yarns that are very irregular, or slubbed, will snag and abrade significantly. To remove a slub: place your hands about 12" apart on either side of the slub. Untwist until the fibres are parallel, then pull steadily to thin the slub. It is far easier to slow down your treadling and avoid slubs in the first place.
Finishing
I usually finish my yarns by winding them on a blocker and steaming them to set the twist. You will find that yarns spun from caps and hankies are lightweight with a moderate lustre and some texture due to the presence of short fibres mixed with long fibres.
A variety of dye colours applied in random or regular patterns make fascinating blends when the fibres are stretched for spinning. A little fibre goes a long way. I made a tunic length blouse with elbow-length dolman sleeves from six ounces of caps! So venture forth and try one of the more unusual fibres available to handspinners. Peeling layers of caps and hankies is addicting! Mawata reminds me of the minerals called mica - they both glisten and peel neatly into thin layers!
Tussah Noil
Noil can be worked in two ways...
- Carding A Thin Layer On Hand Carders Remove any stiff pieces, or large chunks of pupa and make an airy rolag.
Spinning this preparation - Spin these very short fibres using the long draw technique. Hold the fibres approximately a staple length back from where the yarn is forming. Since the fibres are short, hold the rolag right near the end. This provides the most control. One end of the fibre will be caught in the twist and you will be lightly stretching the other end. If the fibres are held too far back, the other end won't be stretching and slubs will appear in your yarn. Noil naturally makes a textured yarn, but will not wear well if the slubs are too large. Be sure to test the strength by gently pulling on a length of yarn, which should not slip. If it is to be plied, double the yarn on itself to see if the plied yarn looks sufficiently twisted. Adjust accordingly. One last word on the long draw method: as you treadle, draw slowly back at the rate that the yarn is forming. If drafted too slowly, relative to the twist, the yarn will thicken and get overtwisted. If drafted too quickly, relative to the twist, the yarn will get thinner and softer. Use your other hand as a "valve" on the twist. Rest it on the yarn a comfortable distance from the orifice, and squeeze the yarn - on and off, on and off. If the twist is too firmly set in the fibres, pinch the twist off until you can draft more. Once you have got the twist worked out, release the pinch and more twist will travel up into the fibres and drafting can continue. - Knickerbocker Yarns
My favourite use of noil is to make 'knickerbocker' yarns. These are yarns with spots. Short silk noils make perfect spots in yarn! Dye the noil in different colours that will look good with the base fibre. Yak down, cashmere, merino or anything can be used as a base fibre. Card the base fibre on hand cards once or twice to get some of it on each carder. Then sprinkle some noil on top and card it well. If both the base and the noil are short, spin it in the same long draw method as above. Noil can also be blended with a longer fibre like wool, and spun with either a long or short draw.
Staple Length:
| Silk Bamboo | 5" - 6" |
| Silk Cotton | 3" - 4" |
| Silk Cashmere | 4.5" - 5" |
| Silk Wool | 5.5" - 6" |
| Silk Camel | 1" - 1.5" |
| Silk Yak | 1" - 1.5" |
Blends - Combed Sliver
My favourite way to spin silk blends sliver is with a method called "spinning out of the fold" which works well with a long draw. With this technique the twist enters the fibres as drawn out, as opposed to a worsted or short draw where drafting occurs in the absence of twist. The fibres act differently in these two instances. When the long silk fibres are drafted from the end of the top, sometimes a thin spot develops, or too many fibres get caught in the twist when spinning from the end with the long draw. If a piece of sliver is pulled that is the width of the sliver and staple length of the fibre long is folded over the index finger, it handles much better. Attach the leader to the middle of the staple length – the fold.
Tips: Use your thumb and middle fingers to tension the fibres around your index finger. Anchor the fibres by closing your ring and pinkie fingers over the ends of the staple length piece, holding them in your palm. Don't be tempted to use too long of a piece. You will "spin the middle out of it" and be left will 2 pieces in a mess in your hand. If you like to spin with a short, worsted draw, carefully split the fibres into thinner strips lengthways and elongate slightly to make them less dense. Spin from the end, being sure to keep the fibres fanned open rather than compact and keep your hands a staple length apart for ease in drafting.
Multicolored Silk Fiber Blend
This is a relatively short fibre that makes a quick novelty yarn. Like tussah noil this multi color waste can be worked in two ways. Spun on its own it looks grey or brown from a distance, but carding a thin layer on hand cards has interesting bits of colored thread as accents when you get close.
It can be blended with other fibres. I have blended it with wool, with interesting effects. The grey quality of the base color can be brightened up by blending it with another brighter color. Conversely, it can be used to dull a color that is too bright and get the best of both: a colur that is not garish, and a brighter look to the neutral waste with all the fun accent threads.
Knickerbocker Yarn
Card in a manner similar to the 'knickerbocker' yarn described in the noil section. Card the base color a few times to get some on each carder. Lay some of the multicolor waste on the cards and blend thoroughly. Roll into a rolag and spin with your preferred method.
Carrier Silk Rods
These slit tubes are the by–product of reeling silk from the cocoon. As the silk filament is unraveled from the cocoon into skein form, some of the filaments get wound around the machinery. This silk with the sericin still in it is then slit and removed. The rods are 5 – 5½" (13 – 15cm) long when whole and unscrunched.
There may be some short pieces and partially wound cocoons in the mix. They are wonderfully textural for stitching, silk fusion and any application needing depth. They can be pressed flat or pulled apart to reveal the interesting criss–cross of the fibres. These rods have so much personality, you won't know what you can do with them until you try.
Carded Cocoon Strippins
This fibre is the first silk extruded by the silkworm. and looks like slightly disorganised puffs of carded fibre. It produces a fairly smooth yarn with a matte appearance.
Celia has worked with this new product and offers the following advice and suggestions.
It can be spun as is with a slight teasing or carded before spinning. Use cotton cards, which are finer than wool cards, because they give better results. The fibres will slip past each other more easily if the rolag is airy and not compacted. If you spin without carding, tease the fibres slightly between your fingers – it will help the fibres draft a little more readily while spinning.
These fibres spin nicely with both a long draw (drafting hand moves away from the orifice as the twist enters the fibres) and with a worsted method (draw forward, slide back). I could not just draft back with one hand to get the control I wanted with the long draw. I had to use the other hand to smooth any lumps and to aid in drafting a smooth yarn.
Throwsters Silk Waste
Thrown silk waste is a by-product of the twisting of filament in the reeled silk industry. There are many different types of thrown silks that have been twisted with low, medium or high twist, depending on their intended use. When things go wrong in the throwing mill and fibres tangle around the machine or are otherwise unable to be used for finished yarns, they become thrown silk waste. It is unlike any other fibre on the market and an inexpensive source of high quality, long silk fibre. It can be handled in several ways to create textured or smooth, shiny yarns and can also be an inexpensive source of silk for blending.
Celia worked with this new product and offers the the following advice and suggestions.
There are a few distinct characteristics of thrown silk waste you will notice right away when you purchase this fibre. First of all, the fibres may be dyed in multiple colors and they will also be stiff with sericin (gum) which is residual from the silkworm's spinning process. I do not recommend spinning before degumming the silk as it is unpleasant and produces a hairier yarn than if you degum first. The colours are fugitive - they will wash out when you degum to leave the silk soft and shiny.
Once you degum the silk by simmering it in a soap and soda solution, the silk is ready to dye (or not) and spin. I place the wet silk either in aluminum pie pans or on a piece of plastic wrap for the dyeing process.
Apply the dye in liquid solution that contains the acid necessary to set the color to the silk. Sabraset dye was used on these samples. Push on the fibres to encourage the dye to penetrate to the centre layers (don't try to dye too thick of a layer at once). Once the top is well saturated with dye, flip the fibres and repeat the process on the other side. Layer the pie pans on a streaming rack or roll and stack on the steaming rack. Steam at a full head of steam for 15-20 mins to set the dye. You can also put the thrown waste into a pot and dye it with an immersion method. Keep the temperature down below a simmer (170-175F) to preserve the lustre of the silk.
Degumming Recipe
by Celia Quinn
| Materials |
|
| |
After the fibre is degummed or dyed and dried you will notice several types of fibre: 1) coils of long "pencil roving" which are 1/4" or less, shiny, long and smooth 2) thick "rovings" 1/2"-1" wide that are smooth, long and shiny 3) kinky sections of fibre that obviously had some twist inserted before becoming waste, and 4) tangled sections of fibres. There are several ways to approach the spinning thrown silk waste.
- "Pencil rovings" - The fibres are much too long to draft as is. They must be twisted without drafting or cut before spinning. a) Separate out many coils of the same width from the pile of thrown waste. Simply twist each one on your wheel joining the ends together to make a thick, shiny yarn. b) Cut the fibres to a comfortable staple length and either draft from the end or fold a piece over your index finger (4" minimum for this) before drafting from the centre of the fold. c) Cut to a comfortable length for carding either by itself or in a blend iwth other fibres. If blending cut it the same length as the fibre you are blending it with.
- "Thicker rovings" - Follow the same recommendations as above for pencil rovings but use your judgement as to how thick of a roving to use for simply twisting into a yarn. Too thick would not make an attractive or durable yarn.
- "Kinky" fibres - This can be used to make a yarn that remotely resembles "eyelash" yarn. Simply cut them to a comfortable staple length and spin as is being careful not to slick down all the "eyelashes" as you spin but make sure you have adequate twist to hold them in the yarn securely. Plying would help stabilise the yarn.
- Tangled fibres - The only way I have found to deal with these fibres is to cut them up with scissors. You will probably have to discard some tangles but you can usually salvage some of them. Use this silk for carded blends.